Wednesday, October 24, 2012

Leather knife sheath tutorial

I wanted to post my version of a sheath tutorial, which does not utilize a wooden insert. Wooden inserts do indeed make a sturdier sheath but I like simple things and a while ago I decided to make a sheath sans insert, mostly to see how sturdy it could be, and to try something different. My brother over at Fisker Fjord Knives utilizes the wooden insert for his sheaths and they look fantastic, but sometimes different is good, too, right? Here goes:
Start off with folding a piece of paper lengthwise and place the knife down on the paper, with the spine of the knife parallel to the fold.
Along the edge of the blade and handle, place small marks on the paper, allowing for contours and curves of the knife.
Trace a single line based on your markings. I make the marks about a 1/2" or so wider than the knife and handle. Be sure to mark where you want the sheath to end as well.
Cut out along the line, cutting both sides of the paper at once. This allows an even cut on both sides. Now, I put the knife in the paper cutout and fold over to see if any additional leather will be needed. Remember, it is much easier to work with more leather than less.


Trace the paper cutout on your leather, allowing a little more space if need be and cut the leather to size. I then submerge the leather into warm water for 10-15 minutes. This allows for a full saturation of the leather.
Oil the blade then cover the knife in its entirety to protect it from moisture. Place the knife in the sheath and place clamps along the outer edge of the sheath, pulling it tight. Wetting the leather makes it very pliable and once dried it will maintain its shape, so be sure to get the shape you want. I let my sheath dry for 12-24 hours, in order to allow the leather to dry enough to maintain its shape yet still damp enough to work with  - it is easier than completely dry leather.


 Next, I use an awl to create my holes. I mark them out first with small holes then when satisfied I use the awl to puncture the leather enough to go through one side and make a mark on the other. I then puncture the other side. Do this all the way up. I start from the bottom and go up, and leave a little space at the top - this is where I will make a larger hole for the hanger.
I use synthetic sinew thread. It is waxed and has a sticky feel to it, and looks very similar to actual sinew. This is the next best thing to using the real thing! I do a saddle stitch using two needles and go through each hole with both needles. Remember if you begin with the left side then pass the other needle through the right (or vise verse) you will need to always pass through the left again when beginning a new hole. Pull it tight and sew all the way up. At the top, I reverse order a few holes then back up to the top to create a tighter stitch. Knot several times at the top and cut off excess thread.
Here is the sheath sewed up. Now, I made a hole up at the top for the hanger. For the hanger, I cut a thin slice of leather about 8" long with a wider section at one end and a thin section at the other. Cut a slit in the wide end.
Pass the hanger through the hole and then place the thin section of the hanger through the slit at the wide end.
Make the knot by wrapping the end of the hanger under and through the hole you have created then back through the top hole. Pull it very tight. Sometimes it helps to wet this piece of the hanger to secure the knot even more. I did not have to with this one but it does work well if you wet it. Get hanger the size you want (make sure it is not too small or a belt won't go through). When it is tight and you are happy with it, cut off the excess leather.

It should look something like this. Now it is time to put stain and finisher on it. Finisher will create a waterproof protection and harden the leather not to mention give it a beautiful color. There are many brands out there, but I use Eco-Flo All-In-One Stain and Finisher from Tandy Leather Factory.

Here is the finished sheath. Be sure to use gloves and cloths to put the stain on/wipe off as soon as possible. If you put this stain on and wait too long it begins to streak and you will have to go over it more. I use a healthy amount and rub in a circular pattern, repeating this until the desired color.

Please feel free to send feedback or photos of your sheaths, especially if you use this method. Hope you enjoy!

Sunday, October 21, 2012

Yellowheart (Pau Amarelo) and Leather Knife

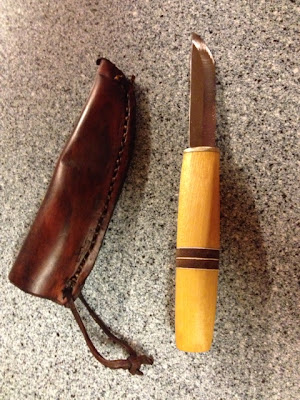
This is a knife I made which is a part of my South American Collection. I have three knives made of South American woods, and another one I intend to start on soon. The other completed knives are made of Argentinian Osage Orange (Maclura Tinctoria) and Canarywood (Centrolobium spp.) and the one planned is going to be Leopardwood (Roupala spp.).

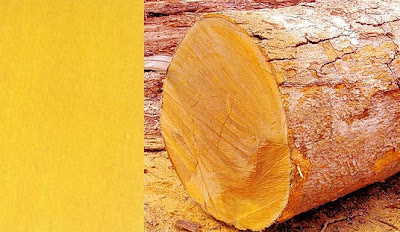
I made the handle design using only two leather spacers and yellowheart. Yellowheart (Euxylophora paraensis) is a yellow wood from Brazil, also known as Brazilian Satinwood, Pau Amarello, Pau Amarelo, Amarelão, Amarelinho, Amarelo, Amarelo-cetim, Cetim, Espinheiro, Limãorana, Muiratanã, Muiratauá, Pau-amarelo, Pau-cetim, Pequiá-cetim, and Piquiá-cetim. That is a lot of names!
I really love the color of this wood, especially since it is so unusual. Take a look at the photo below or click here:


Very beautiful wood! Hardwood is yellow and sapwood is pale yellow to a yellowy-white. Aside from the very odd odor this wood gives off when sanding or cutting, it was a dream to work with. It has a fine texture and even with a belt sander I managed to get this handle quite smooth. It had the occasional splinter when working with it but no issues here as I used gloves (I read somewhere it can splinter, and I did not want to find out the hard way if this exotic wood can cause dermatitis when a splinter gets under the skin).


The photo above shows the knife after the yellowheart was cut into two pieces. I used a Finnish Lauri 85 x 17 mm stainless steel blade.
I have seen a lot of knives with two separate pieces of wood in the the handle, and I like that style a lot, so I decided to do it. I did, however, intentionally make the bottom piece shorter than the upper part to create a unique, seldom seen design in a handle. I used white fiber spacers and tan leather spacers to create a nice color contrast within the handle.
As you can see below, it turned out very nicely!


I also made a Scandinavian style sheath for this knife, take a look below:


Soon, as I work on my next knife and sheath, I will create a tutorial so those who are interested can see this process in a step-by-step basis. Making the sheath is just as fun as making the knife, which is called the Metsä, Finnish for "forest". Hope you enjoy.

Thursday, October 11, 2012

Knife made with family pride

This next knife I want to discuss has a very personal meaning behind it. My oldest brother, Tom, passed away last September. He was an avid hunter, especially deer. He used the meat to make ground venison, steaks, jerky, tenderloin chops, and probably lots of other food items I have no clue about. He saved a couple of antlers and after he passed away, my niece gave me some of the antlers to make a knife with. Much to my wife's chagrin, I kept the antlers in the back of my SUV for several months before doing anything with them. Then, a few months ago, I realized it was time to make a knife out of it, and the best part of all, I decided to make it for my Dad.
My Dad can work circles around me and uses a knife a lot. He is a plumber by trade and has a need to constantly cut loads of things. He, like me and my other two brothers, enjoys carrying a knife, usually of the pocketknife variety. Still, I don't think he owns a fixed blade, or at least I haven't seen him with one. So, I thought this would be a good Christmas present for the man who is impossible to buy for. I feel bad constantly giving him Lowe's or Home Depot gift cards, but this is usually what he asks for (this time, I think he will be pleasantly surprised).
I used cocobolo, a reddish brown, oily wood from the forests of Central America. Like most rosewoods, the oil in the wood provides a natural resistance to decay, and when sanded or cut, it gives off a floral, almost spicy scent. Very unique to say the least. I thought the dark color of the cocobolo would be a nice contrast to the white color of the deer antler. To add even more contrast, I added a tan leather spacer and white fiber spacers. Here is what the knife looked like after I epoxied everything together. As you can see, I got a little crazy with the epoxy, and thought I might have overdone it to the point of failure.


I sent this photo to my brother who also makes knives and sheaths (Fisker Fjord Knives) and, well let's just say he was a little worried about the final result. But, after lots of sanding and sanding some more, I finally stopped. After applying danish oil and re-sanding using 800 grit paper, the "Hirvi" was done (Hirvi is "deer" in Finnish). Here is the finished product:


Much nicer, don't you think? It is hard to believe this is the result of the previous photo. And this is the crux of why I love to work with woods and materials - taking a block of wood, a piece of leather, a metal blade, and a hunk of deer antler, and shaping them together to form one cohesive, artful tool. Fisker Fjord Knives is currently in the process of making a perfectly fitting Scandinavian style leather sheath to complete the Christmas gift to our Dad. 
It gave me such joy to have been able to use Tom's antler to create this knife, and to preserve the memory of a lost brother. And so the legacy lives on.

Wednesday, October 3, 2012

Knife making materials

There are lots of ways to create knives and knife handles. For instance, I have used reindeer and deer antler for spacers, vulcanized fiber materials for spacers, and leather (both tan and black). My brother (Fisker Fjord Knives) has used different types of wood to create his knife handles as well, and this is something I find very interesting. All the knives I have made thus far have included only one type of wood, although on a few I have cut pieces of the wood to create an upper and lower wood portion to the handle. I also have moose antler I am planning on using soon.
Some of the other materials to use include birch bark, camel bone, giraffe bone, zebra bone, mammoth bone, walrus tusk, and even walrus oosik. If you don't know what oosik is, it is the penile bone found in most mammals (humans excluded). These are fossilized mostly, and can be up to two feet or more in length.
For a list of all woods used in my knives, or woods I am planning to use, please click on the Woods link at the top of any of our blog's pages.
There are a lot of places that sell knife making materials on the internet, but I predominantly use Thompson's Scandinavian Knife Supply. They have a very good inventory and shipping/response time is very quick. I would highly recommend them if you are interested in purchasing materials.
I try to think of good combinations of materials and woods to use in conjunction with one another. For example, I made a large puukko once and wanted to use traditional, Scandinavian materials for the knife. As with all my knives, I use Lauri carbon or stainless steel blades, all with the Scandinavian grind of one bevel - and a very sharp one at that. For the handle, I used reindeer antler and Arctic curly birch, both found in Scandinavia. Here is a photo of the knife after the items were put together and sanded, yet before Danish oil was applied:


Also used were a nickel bolster and black fiber spacers. Notice a small scuff mark on the blade, As I was sanding, the blade cover came off and the belt sander hit the blade. I had the blade section taped up, which is a necessity, but the sawdust must have got into the taped section and through the force of the belt sander the taped covering came off before I could stop it. This is a mistake that could have a) caused me injury, and b) decreased the aesthetics of the knife. I have since learned from my mistakes and tightly tape the knife using masking tape along with cardboard for further protection. I think this is a very nice knife even with the small blade scuff, but image is everything, so I will do all I can to prevent these types of mistakes from ever occurring. I also think I could have sanded down the handle more, or used a smaller bolster, but I did want to create a large handle capable of withstanding a lot of force. Here is a photo of the knife after using Danish oil for sealant and protection. 


The last step will be to put some wax (beeswax or carnauba, for example) on the handle and buff it to a satin finish. This Naali knife is the "Poro", which means "Reindeer" in Finnish.